by Walter Valdez
You’re looking at your home office. Not the curated space you see on social media, but the real one. The one with the scuffed walls, the stained carpet from a forgotten coffee, and the pile of papers that’s become a permanent fixture because there’s nowhere else for it to go. You know a change would boost your productivity, maybe even your mood, but the thought of coordinating a painter, a flooring guy, and a carpenter feels like a second job.
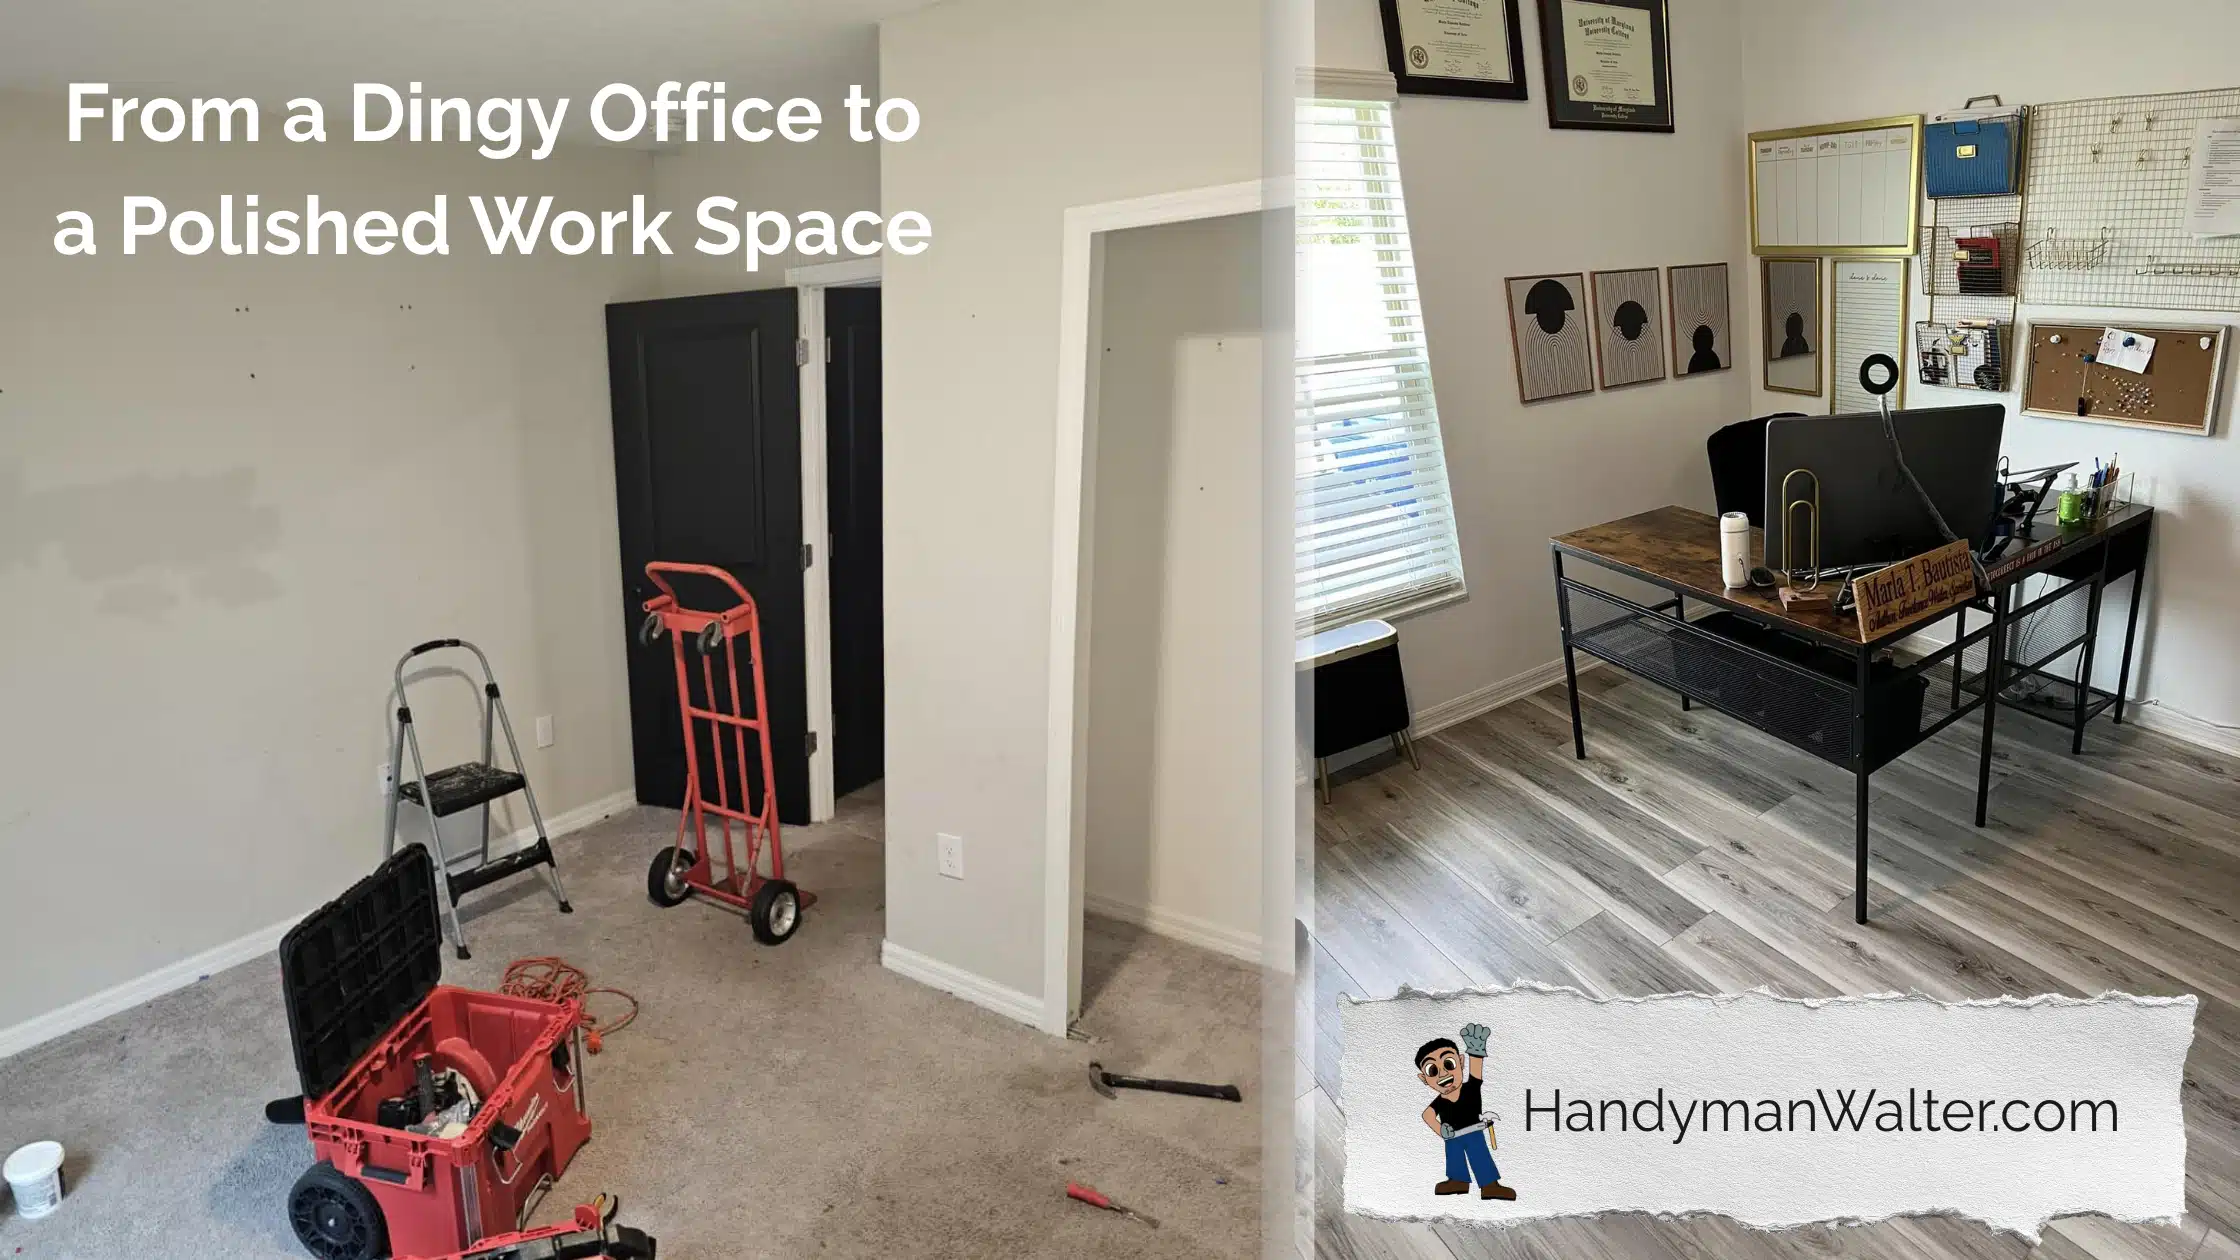
This was the exact situation for a family in Brandon. Their 120-square-foot spare room was pulling double duty as a home office and storage closet, and failing at both. They were ready for a change but were stuck, thinking the project was too small for a general contractor but too complex for a single-trade specialist. They needed a single, reliable solution. This is the story of how we transformed their cluttered space into a polished, functional workspace in just four days.
The Challenge: A Room Working Against Itself
The core problem wasn’t just aesthetics; it was function. The room was a collection of pain points that made focused work nearly impossible. Every day, the homeowners faced a workspace that felt cramped, dark, and disorganized. The project wasn’t about luxury, it was about reclaiming a vital part of their home.
Here’s what we were up against:
Poor Lighting: Dark, contractor-grade beige paint absorbed the little natural light available, making the room feel gloomy even on a sunny Florida day.
Worn Flooring: The original carpeting was over a decade old, showing visible wear paths, stains, and a generally dingy appearance that no deep clean could fix.
Wall Damage: Years of use had left behind scuffs, dings, and holes from previous attempts at hanging shelves. A simple coat of paint wouldn’t be enough. Any new installation would require expert drywall repair to ensure a clean finish.

The Approach: A Three-Part Strategic Overhaul
To turn this space around, you don’t just start painting. You need a plan where each element supports the others. Our strategy was simple: build from the ground up with light, durability, and organization as our guiding principles.
First, we addressed the foundation of the room: the floor. The old carpet had to go. We recommended a light-colored Luxury Vinyl Plank (LVP) flooring. It’s incredibly durable, waterproof (a must in humid Tampa Bay), and its bright finish would immediately make the room feel larger and cleaner. This is a common solution we use for projects requiring new flooring installation in Brandon homes.
Next, paint. We selected a high-quality satin finish paint in a light neutral shade. This choice wasn’t arbitrary. A satin finish offers a soft sheen that reflects light better than a flat finish, making the space brighter without creating a harsh glare. It’s also much easier to clean than matte paint, a practical choice for a high-use area.
Finally, install the new flooring, hang the pictures, and set up the furniture.
Key Takeaway: A successful renovation isn’t about isolated fixes. It’s about a unified system. The right floors make the paint look brighter, and the right storage keeps the new floors clear. When you hire one professional for all three, you get a cohesive plan, not just a series of tasks.
Implementation: Four Days from Dingy to Done
With a clear plan, the execution was efficient and predictable. This is the advantage of working with a multi-skilled professional; there’s no waiting for the next contractor to show up. The project flowed smoothly from one stage to the next.
Day 1: Demolition and Prep. We removed the old carpet, padding, and baseboards. We then addressed all the dings and holes in the walls, applying new drywall compound and sanding it smooth for a flawless surface. All outlets were masked, and floors were protected.
Day 2: Painting. With the prep work done, we applied two coats of the chosen paint to the walls and ceiling. The transformation was immediate. The room already felt twice as big and infinitely cleaner.
Day 3: Flooring. The new LVP flooring was installed. This process is quick and clean, with each plank locking into place. We finished by installing new, freshly painted baseboards for a crisp, professional look.
Day 4: Finishing Touches. The final step was setting up the furniture and hanging the pictures. After a thorough cleanup, the room was ready for the homeowners.

|
Feature |
Before Makeover |
After Makeover |
|---|---|---|
|
Lighting |
Dark, light-absorbing paint |
Bright, light-reflecting satin finish |
|
Flooring |
Stained, 10-year-old carpet |
Durable, light-colored LVP |
|
Timeline |
Weeks of planning and coordination |
4 days from start to finish |
What to Learn From This Transformation
This project is more than just a before-and-after. It’s a template for how you can approach that nagging project on your own to-do list. It proves that a small, well-planned renovation can have an outsized impact on your daily life. An organized, pleasant workspace isn’t a luxury; it’s a tool that helps you do your best work and feel good while you do it. Studies on home improvements consistently show that updated, functional spaces add tangible value to your property and well-being, a fact confirmed by industry groups like the National Association of Home Builders.
Here are the key lessons from this Brandon office makeover:
Don’t Underestimate the Basics: Fresh paint and new floors are the two most powerful tools for transforming a room. They set the stage for everything else.
Think Vertically: In smaller rooms, using wall space for storage is the single best way to reduce clutter and create a feeling of spaciousness.
Consolidate Your Trades: The biggest source of delay and frustration in small projects is managing multiple contractors. Finding one skilled professional who can handle paint, floors, and assembly saves you time, money, and headaches.
Act on Your ‘To-Do’ List: That project you’ve been putting off could be done in less than a week, completely changing how you use and feel about your home.
If you’re tired of a space that doesn’t work for you, it’s time to create one that does. A project like this is within reach, and the results can be transformative. If you’re in the Brandon or Tampa Bay area and want to see how Handyman Walter can manage your entire project from start to finish, you can get in touch with us.